Today’s wonderful yarn craft tutorial is by super talented blogger Jennifer from Jennifer Grace Creates.
By the way, she has a fantastic giveaway running at the moment, so why not pop over after you’ve finished reading this post – you could win some fantastic prizes! Over to Jennifer…
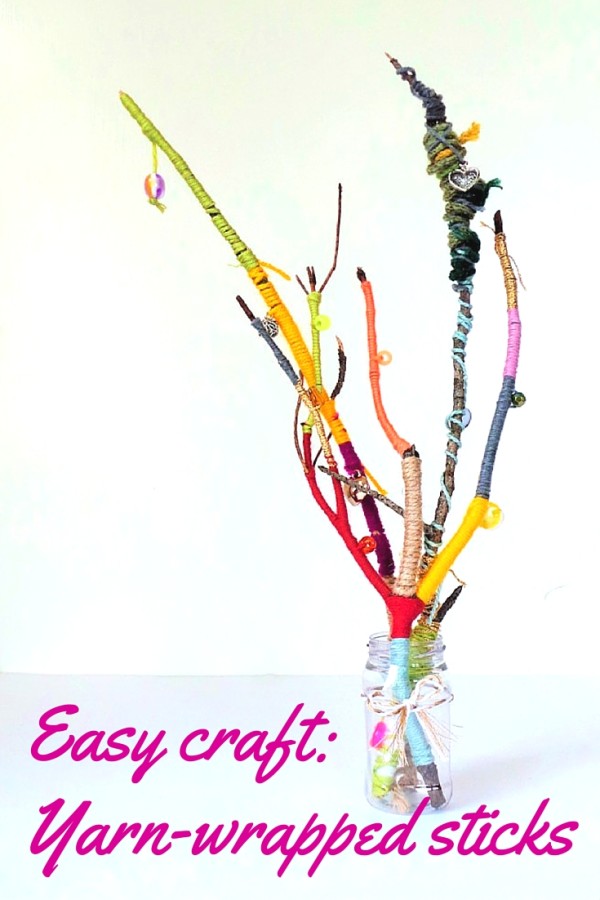
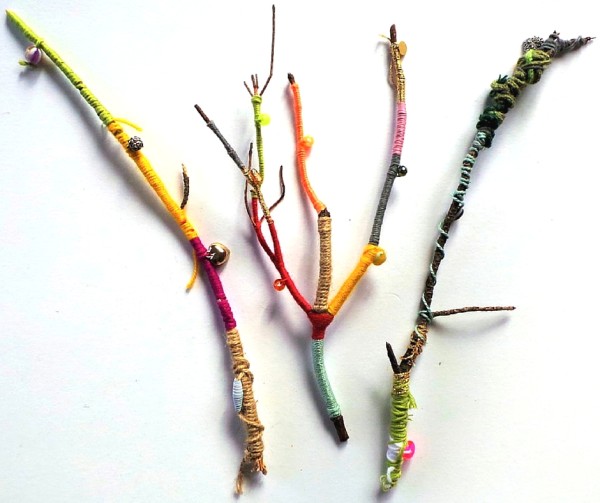
This easy yarn craft is a perfect activity for kids like mine, who are always collecting armfuls of sticks to bring home. After a recent Autumnal walk I allowed them to bring a few in, and we got to work wrapping them with wool and beads, for a colourful decoration that can be displayed all year round.

Yarn craft: how to make your wrapped sticks:
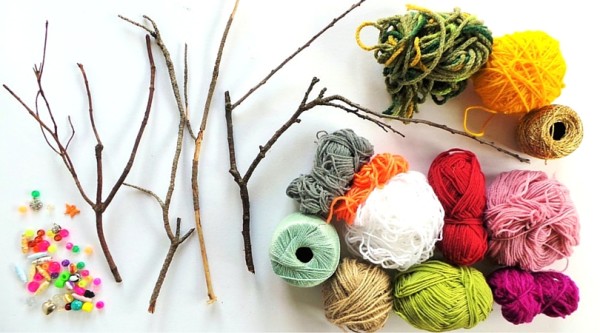
Gather a few twigs, lots of colours of yarn / wool, and a selection of beads with holes big enough for the yarn to go through. Also (not pictured) you will need a darning needle.
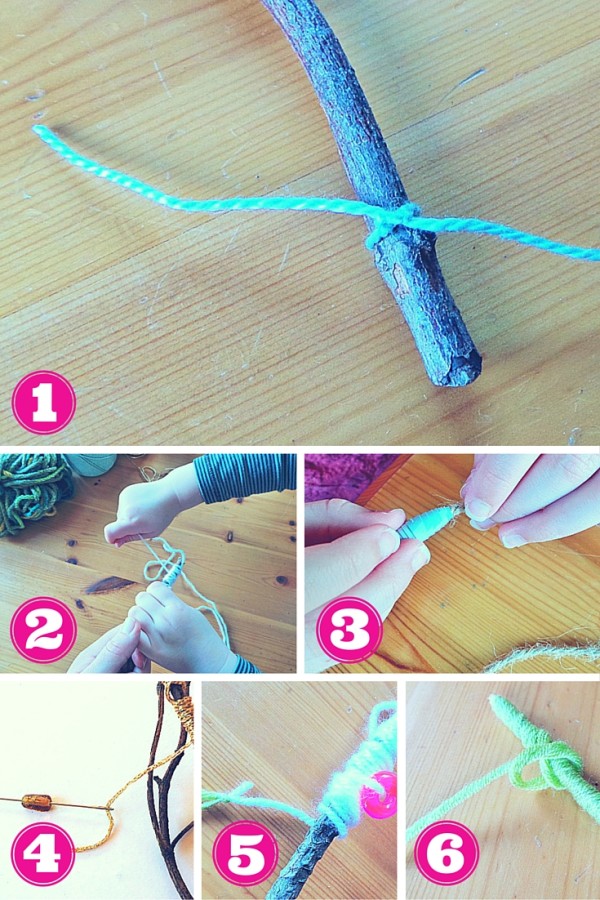
- Let your kids choose a twig / stick each to wrap – encourage younger children to pick a straight stick without many divisions as it will be easier to wrap. To begin just cut a length of your first colour of yarn – we cut ours about 2 arm-lengths (kids arms!) long. Then tie one end of it in a knot around the base of a twig.
- Hold the loose piece of yarn against the stick, then start wrapping the wool upwards around the stick, going over the loose end of wool as you go so it’s hidden.
- If you want to add a bead just thread it on and keep wrapping
- Some beads may require the use of a darning needle to help get the wool through the hole.
- When you need to start a new colour just tie the old colour to the new one using a reef knot or other strong knot and keep wrapping.
- When you reach the top of the stick just tie another knot around the stick, then use the darning needle to tuck the loose end through before cutting it off.
- Wrap any side-shoots too, then your sticks are ready to admire.
Stand them in a jar, hang them on the wall, or lay them on a shelf.
If you want to let the kids play with them, you might want to add some glue under the yarn, at the points where you join new colours, or where the beads are hanging from. I didn’t expect the kids to want to play with them, but cheeky boy keeps waving his around like a magic wand, so some of the yarn is looking a bit looser (his was more loosely wrapped in the first place too). He doesn’t mind, but next time I would add some blobs of hot glue while making his!
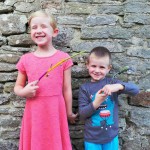 Cheeky boy definitely found it more difficult, and his finished stick isn’t as neat as the other two, but it’s full of character. Little Miss shocked me as she didn’t want to use too many colours or beads, she planned it very carefully. The kids both loved making these and I liked making my own too!
Thank you so much Gude for having me as a guest blogger!
No, thank YOU Jennifer for the wonderful tutorial! – Gude

Jennifer from Jennifer Grace Creates is a mum of two (Little Miss age 7, and Cheeky Boy age 4) from Dorset, UK. Her blog is filled with all kinds of craft tutorials and reviews, including scrapbooking, cardmaking, diy gifts, home decor, and kids crafts! In her spare time she likes to read books that whisk her away to magical places (Harry Potter is one of her favourites), or go on family walks to the beach or ruined castles.


I used this craft as an activity for my homeschool group, and the kids LOVED it!