
It’s helpful to know how to blow out eggs for Easter decorations. It can be a bit messy (which kids love) and the wet fart noises that eggs make are guaranteed to give preschoolers the giggles. Why not give it a go as a family?
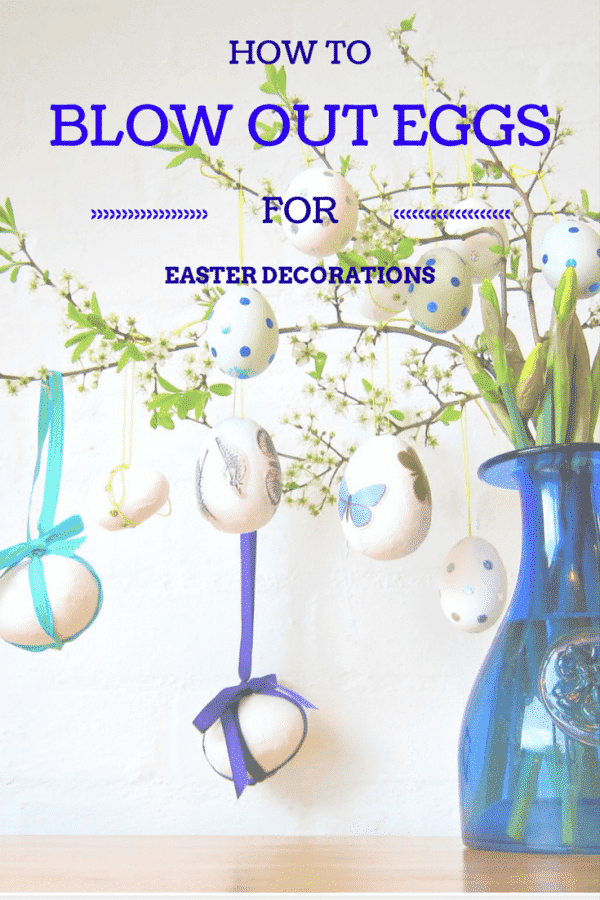
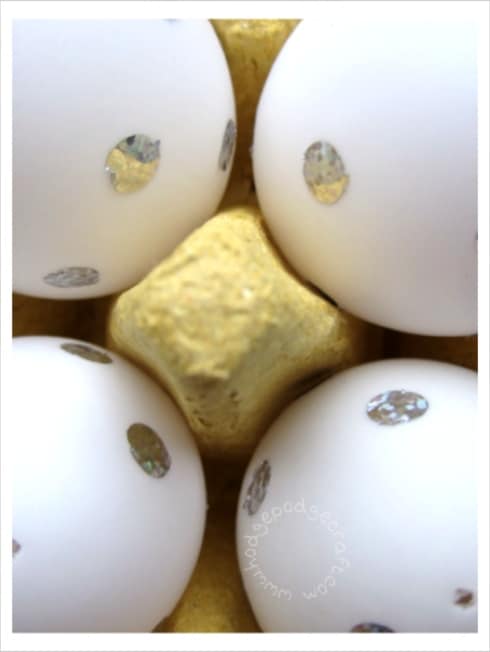
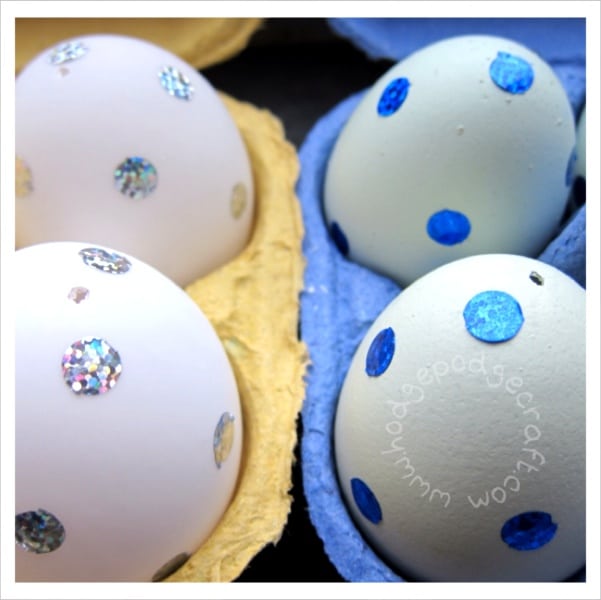
We made Easter decorations by blowing out chicken and duck eggs. We decided not to paint them, as the natural colours and textures of the eggs were beautiful (so we just added sparkly polka-dots)!
To blow-out eggs for Easter decorations, you will need:
– eggs (we used Cotswold Legbar chicken eggs for their lovely blue colour and pure white duck eggs)
– keep the egg box (it’s useful to stand the empty eggs in to dry)
– a pin
– a large bowl
– holographic dot stickers (optional)
COST: a few quid (unless you own chickens/ducks)
AGE: young kids and up
TIME: 10 minutes or less (per egg) – this is a fun group craft!
How to blow-out eggs for Easter decorations:
- Take an egg and use your pin to pierce a hole in the small end (they are less likely to break this way, though I’m not sure why)!
- Pierce the opposite end of the egg.
- Use your pin to widen the holes until they are about the size of the pin head (or the thickness of a skewer).
- You need to pierce right through the egg membrane and the yolk, so don’t be afraid to poke the pin right in and wiggle it around!
- Hold the egg over your large bowl, seal your lips around the top hole and blow steadily into it. The egg should start to come out of the bottom hole. If it doesn’t (or if your eyes start to bulge), you may need to widen the holes a little more.
- Keep blowing until all the insides are out. You may need to use your pin to encourage the stringy cord and yolk sack through the hole. Once these are out, the rest should follow quite quickly.
- Once your egg is empty, take a few sips of water and blow these through the egg (over the sink) until the water runs through clear and the inside of the egg is clean.
- Stand your egg up in the empty box to dry completely. You can put them in a low oven to speed up this process, but it may weaken the shell, so better to be patient!
- Once the eggs are completely dry, you can paint them, or stick polka dots on them, like we did.
- Make a delicious omelette for tea with your egg innards (though probably for family consumption only, given that there may be a bit of saliva mixed in)!
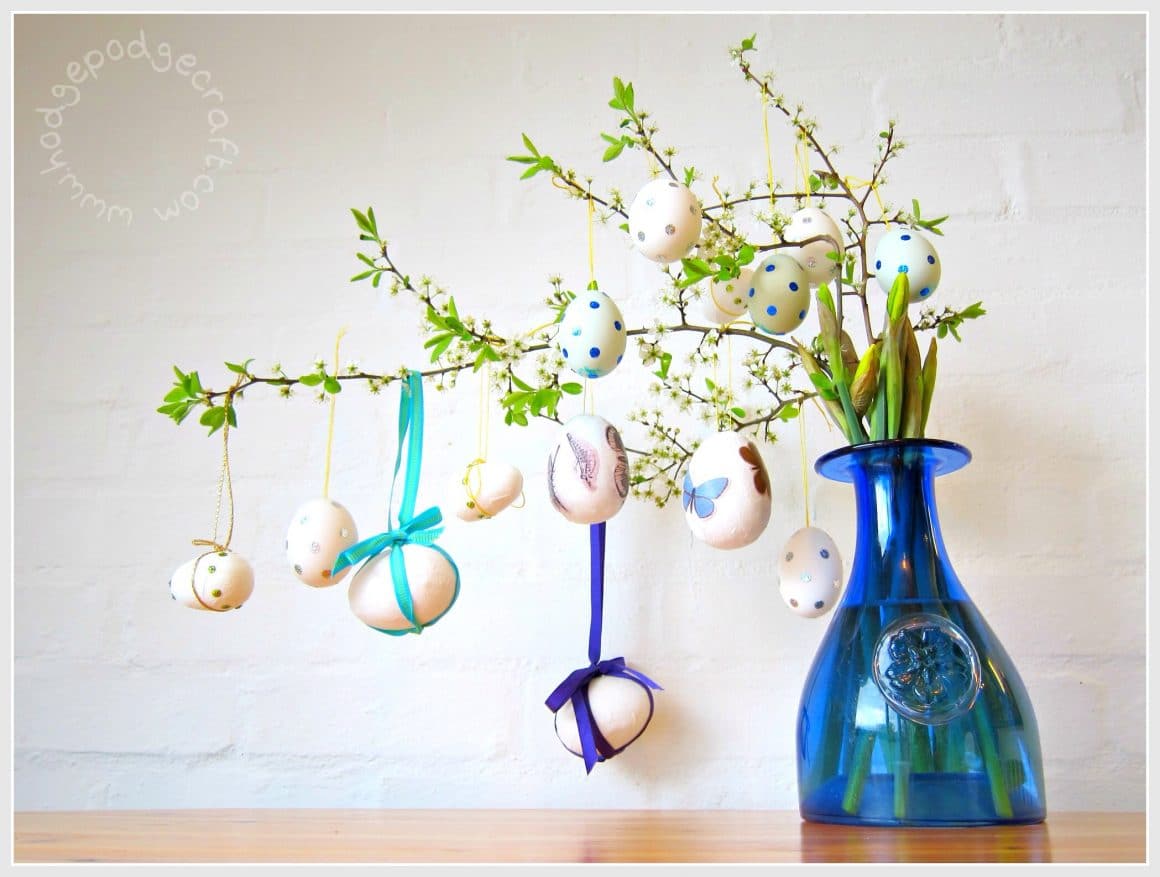
If you want to hang your finished eggs, take a small piece of cocktail stick with a thread or ribbon tied to it, then poke it completely through the top hole of the egg. The cocktail stick will become stuck inside and you can use the thread to suspend the egg artfully from a Spring branch *ahem* see above.
So that’s how to blow-out eggs for Easter decorations. Easy peasy (though time-consuming on your own!) – did you do this at school..?
P.S. I’m linking up with Me and My Shadow for the #GetYourCraftOn Easter challenge (#eggs)


!")

")
")

Cute eggs, a lovely activity to make with children. Kids love glitter 🙂
I love glitter too! 😉
So pretty, and glad to hear the egg inside gets used up too. I love the sparkly decorations!
Thanks Jo!
If you blew too many eggs to eat at once, you could always freeze some for baking another day… x
I’ve never done this but it sounds like a fun thing to do. Not sure about the saliva omelette though!
Best not to think about it too much… 😉
I was only thinking of this the other day I used to do this as a child but not tried it with mine! Something for the weekend!
Yay! Let us know how you got on..?
I remember decorating eggs as a child but haven’t tried it with my children yet. Thanks for the instructions I will have to give it a try. I like that you left them plain save for the dots!
They just looked so pretty naturally… I’ve bought polystyrene ones for painting though! 😉
Lovely idea! I remember myself doing this as a kid, sucha a fun time 😉 I even thought about making some decorations this year for Easter, when I saw my cracked egg shells 😉
There’s plenty of time!
I’ve always thought blown eggs are rather magic, thanks for the step by step instructions, I might even be encouraged to try it now!
You’re welcome Clare – it is dead easy (& they’re stronger than you think)! 😉
this is something i have never done and i am now 30 years old lol, it is a great idea and fun for the children too thanks for sharing x
Really?! Well you’ll have to give it a go now! 😉 x
Duck eggs are perfect for decorating. You make it sound so easy.
They really are lovely, aren’t they? First time I’d done duck eggs, but would definitely do them again!
Brilliant – though not totally sure about the omelette! They really look great though.
Well, saliva is pretty interchangeable here (given the way my youngest kisses!)! Definitely close family only though 😉
Ohh these look great! We’ve got chickens so we always have plenty of eggs 🙂 x
Wow, lucky you! 🙂
I’ve never done this, I’m not sure I’d enjoy it but I know my kids would love it! Thanks for the instructions.
You’re welcome Louisa. You might surprise yourself..! 😉
Ooo great idea, I didn’t realise that’s how you did it. x
Yep – super simple when you know how!
I remember blowing out eggs when I was a kid – it used to make me gag lol, but was always fun to decorate real egg shells!
Oh no! You were blowing & not sucking, right?! 😉
Ohhh wow oh wow I so want to do them they are cool .x
Thanks Hannah! Let me know how you get on?
These look great! It’s something I’ve been meaning to try
Thanks Anna 🙂
I’ve never done this, but will be having a go with the kids this Easter!
Yay! Enjoy! 😀
Love this idea – have not seen it in so long! Definately going to try it with the toddler. Is it easter already?!
Well, close enough, right? 😉
I’ve done something like this when I was a child – but never made them look so sparkly and gorgeous. My girls would love this. We’ll have to give it a try.
Thank you! 🙂
Can’t go wrong with a bit of bling, eh?!
Oh wow, I’ve never tried doing something like this, it looks so cute and sparkly 🙂 Happy Easter and spring time!
Thanks Orli! Happy Easter to you x
Oh they are gorgeous <3 I was never any good at egg blowing I have to admit. x
Thanks Sarah! I would really recommend making larger holes if you’re struggling. With these you can always cover it up with a glitter dot afterwards 😉
Thanks for sharing these instructiosn. I neve rquite understood how to blow out eggs though I might’ve done it as a child.
You’re welcome Astrid – I had to remind myself, it had been so many years since I made some!
I hate blowing eggs but usually use tons over Easter just for decorating lol x
Wow, in that case I’m impressed that you do it!
I have never tried this before but it looks like great fun!
It is! 😀
This is a great craft idea, I remember doing this at school many many years ago x
Classic Easter craft! I think we had a competition to win a book token at our school… 😉
They look great , so pretty. What a fun activity . x
Thanks Wendy! 🙂
These are lovely, I really love the glitter dot decoration (where did you get them from? I would just want to stick them everywhere!!)
#pintorials
Thanks Anthea – they’re from Amazon (come on a roll – lots of colours). Just search for holographic sticker dots x
I remember doing that as a child. My son need to decorate an egg for school next week, so this has reminded me how to do it, thank you. Have pinned.
#Pintorial
Perfect, glad to be of service Karen!
Clever! I like it.
We always use hard boiled eggs for decorating, they will last a week or so before we dispose of them for good.
Hard boiled are much faster (& more durable), but they do tend to weigh down Spring branches! 😉
I love the dot stickers on these, look super cute 🙂 #pintorials
Thanks Kate! 😀 x
Pingback: Easter Egg Craft Ideas: Tuesday Tutorials - Crafts on Sea
Pingback: Hodge Podge / 10 colourful Easter crafts for toddlers
Great idea – perfect timing for Easter crafts this weekend. Thank you for sharing on We Love Weekends – this post is featured on Witty Hoots this week! Hope to see you linking up again soon – have a great weekend!
Fantastic – thanks Helen! Just popped over to have a look 🙂