

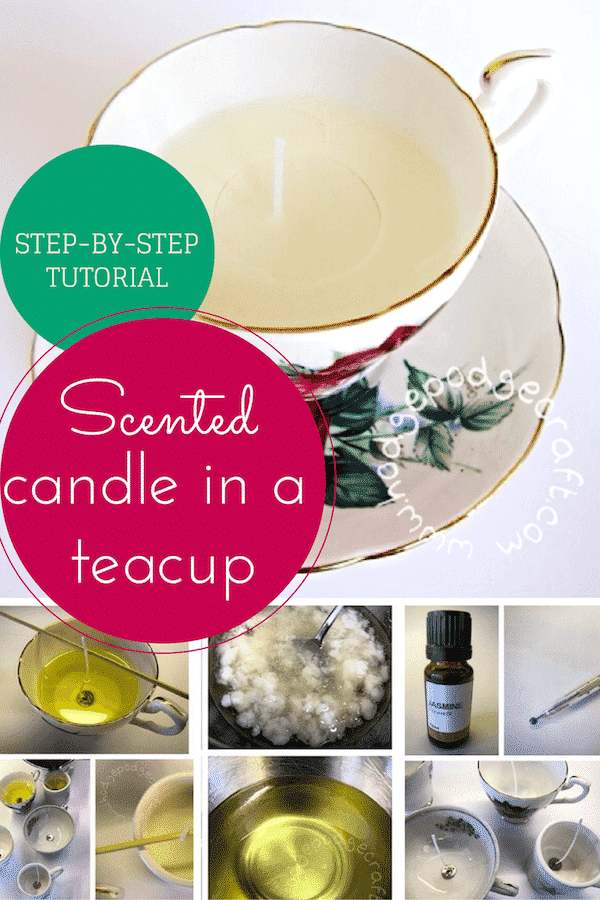
These easy scented candles in a teacup make great gifts (especially vintage ones from the thrift store)!
Here’s a full step-by-step tutorial.
I wanted to learn how to make scented candles in a teacup to give as Christmas gifts. I thought the process would be quite complicated, but it turned out to be very simple (honestly, even young children could help with sticking the wicks, stirring and even pouring the wax as long as they are closely supervised) and I do think this ‘recipe’ is very forgiving! I will definitely be making them again and tailoring the scents to my friends and family. I think they make a lovely gift, especially when you consider that a good quality natural scented candle can cost £20-£30 each!
*this post contains affiliate links*
When you purchase something after clicking on an affiliate link, the price you pay will not be affected, but I will receive a small commission from the seller. Thank you for supporting Hodge Podge Craft in this way.
You will need the following to make scented candles in a teacup:
- 4 vintage teacups (I found loads of these at our local Oxfam). It doesn’t matter if the cups and saucers are mismatched either – they still look cute at the end!
- a cooking thermometer (it needs to be able to measure up to 300F/150C – I used a jam one)
- a double boiler. I don’t have a double-boiler, so I balanced a small metal bowl – with a spout for pouring the wax – on top of a metal ring (cookie-cutter) inside a large saucepan on the stove, then added boiling water to the large saucepan and adjusted the heat on the stove to keep the water bubbling, but not boiling over. If the water runs low, you can top it up using a pre-boiled kettle (the large saucepan must not run dry).
- a little blue-tac or 4x glue dots
- approx 500g eco soya candle-making wax flakes for containers
- pre-waxed wicks for candle-making (I used 80mm length and cut them down a little once the candle had set)
- 2-3ml natural fragrance oil (make sure you do not use alcohol or water-based fragrance). I chose jasmine, but you could choose any scent you wanted and you could also combine 2 or 3 scents together. Next time I might try jasmine and rose essential oil…
COST: under £15
AGE: 3+ (with help)
TIME: about an hour to make, then overnight to allow them to set properly
How to make scented candles in a teacup:
Check how much soy wax you need to melt (the easiest way to do this is to measure it out using the tea cups that you will be using as moulds: 2x teacups full of wax flakes = 1 finished teacup candle). I found that 500g wax flakes, once melted, filled 4x standard size teacups.
Spread out some newspaper on your work surface and put your empty teacups on top. Stick the wicks to the bottom of the teacups using the blue tac or glue dots and use a pencil/skewer or two to hold the wicks upright.
https://www.instagram.com/p/bpEEMZGejS/
Place your wax in your double-boiler (or makeshift double-boiler – see above!) and let it melt. Never leave the melting wax unattended. Once the melted wax reaches 175F (80C), you can add your fragrance. Take it off the heat and stir gently for a few minutes to make sure the scent is mixed in evenly.
https://www.instagram.com/p/bpEln-mekS/
Once the wax has cooled to 135F (57C), carefully pour the wax into your teacups and re-centre the wicks if necessary (I am cack-handed and managed to knock them all on the wonk during the pouring!)
https://www.instagram.com/p/bpEslFmekc/
Leave to set overnight, then either light and enjoy them yourself, or wrap them up to give to your lucky friends!
PRO-TIP: Apparently if you add a final layer of melted wax to the surface of the set candle, it will give you a smooth, crack-free finish.
So now you know how to make scented candles in a teacup. Will you have a try and let me know how you get on?
By the way, if you fancy trying something different, why not have a go at Crafts on Sea’s beeswax teacup candles?
Pssst… Making this for a new mum? Why not make this gorgeous new baby footprint card too?


Oooh, your blog is pretty awesome!
x
Why thank you very much MisterPodge – I did have a lot of help… 😉
Pingback: Hodge Podge Craft » Gorgeous New Baby Footprint Card
Well done for finding such pretty cups in a charity shop. I check my local ones regularly and have never found anything. I think they get snapped up the moment they arrive
Oh no, really? Naughty ninja teacup snatchers! 🙁
We do have a pretty decent one here – my mum can’t walk past without picking up another toy for Pickle or Chops…
I just found this (tooth fairy door) on your blog and I WANT one! Such a sweet idea 😀
http://knittymummy.blogspot.co.uk/2012/11/pinterest-challenge-tooth-fairy-door.html
I’ve always adored candles in teacups! Such a cute idea for a gift, especially for a tea group.
Why have I never heard of a tea group before?! I must join/start one immediately! 😉
Thank you so much for popping by and commenting Cassandra. By the way – I LOVE your picture with the orange here: http://www.thesacredmiddle.com/1/post/2013/07/watch-with-glittering-eyes.html The colour just pops! x
I did tea cup candles as gifts this past Christmas and everyone LOVED them! I know your friends and family will be so happy to receive these too. The tea cups you used are beautiful!
Thanks so much Kristen – I am so pleased your teacup candles were well received! They are cute aren’t they? I especially liked the ones with the flowers on the inside 🙂
It looks like you’re a tea fan too..! http://www.whateverislovelier.com/2013/07/guide-to-hosting-summer-tea-party.html
Pingback: Hodge Podge Craft » Top 10 gorgeous wedding craft ideas which are simple enough even for kids to do!
Pingback: Hodge Podge Craft » Wordless Wednesday: charity find
just got done making 3 coffee. thank you there so pretty. got my tea cup at the good will
Well done Lori – upcycling at its best! Are you on Twitter? I’d love to see a photo of your teacup candles…
My daughter and I made some but the soya wax has come away from the edges of the cups any suggestions as to what we did wrong.
Hello Joanne and thank you for commenting. Apparently the wax can start to come away from the sides of the container if it cools too quickly. Did you leave it to dry in a very cool place (basement/garage for example)? It can help to warm your container before you pour the wax, so maybe try that next time, as well as allowing them to cool somewhere warmer..?
You could try to fix the edges of your candles by warming the cup with a hairdryer and possibly doing a second pour…
Let me know if that helps at all and good luck!
Where do you buy the wax flakes & wick stuff from ?
Hello Susan, I found them on Amazon (just search for ‘soya candle-making wax flakes for containers’ and ‘pre-waxed wicks’).
Let me know if you find them. If not I can send you some links via email (I just don’t like to advertise for any one company here, as this is not a sponsored post).
Thanks for visiting and commenting 🙂
Thank you for the info. I am on my way to start those candles. Can’t wait!
Fantastic! Let me know how you get on Lisa.
These just look so fab I will have to try them! On a cup hunt now – will let you know how I get on. Super blog x
Thank you Lyn! Hope you find some cute cups and saucers x
Pingback: Happy birthday to Hodge Podge Craft (competition)
Pingback: Five Ways of Making Your Home More Energy Efficient in Winter - My Green Home Blog
Thanks for a useful site, I had fun learning this new craft.
One tip to add is that I used a straw (with a snip in the middle) which holds the wick well. However, I struggled to keep the wick central, any suggestions?
Also, a 2nd pour still resulted in a cracked surface, any idea why this occurred?
Thirdly, I popped a pearl bead in the surface as the wax was cooling, this looks effective and adds a little something.
Ooh, that’s a good idea with the straw Debs! My wicks seemed to stay central with just a pencil/skewer, so I’m afraid I can’t offer any better solution, other than perhaps using masking tape to fix the top of the wick to the straw and the straw to the edge of the teacup..?
That is a shame about your second pour still giving a cracked surface. Sometimes this can mean that the candle has cooled too quickly. Maybe try letting them cool in a warmer room, or stand in a shallow tray of warm water to cool more slowly next time?
I love the idea of a pearl bead in the surface – very glam and great for a candle that is going to be a special gift!
Thanks for commenting – your feedback is really helpful 😀
So love to find such amazingly useful info on all the things I can’t wait to try. Can you tell me though how you poured the melted wax into the teacups. Its the one step that sites don’t share and it seems like it could be the most difficult and messy?
Hi Jan, actually that bit was relatively easy! I have a set of stainless steel bowls with lips for pouring and I just used one of those. I guess you could pour the melted wax into a jug and from there into the teacups, but it would mean twice the washing up… 😉
Could tell me what size and type of wick you used for the cups.
Thanks